Saturday

the "Can't miss BBQ of the Year" Event

For the past 4 years, I have tried every summer to have my "Can't Miss BBQ of the Year" Event. This year, we had about 18 people come. Every year I try to make something new and cook the food that everyone liked from past BBQs. This year, since I was able to get corned beef brisket on sale I decided to try my hand at making pastrami (smoked spiced brisket). I have seen it being made on TV and read recipes. I could create a fake smoker using the charcoal grill. The other foods I made were ribs (dry and wet versions), pineapple bbq sauce (for wet ribs), steak with chimichurri sauce, dry jerk rub and terriyaki style chicken wings, honey glazed and dry jerk rubbed chicken drumsticks, sausage and peppers, grilled veggies, salsa, homemade pickles, fresh lemonade, and ginger peach iced tea.

To prepare for the BBQ, I took the corned beef brisket and soaked in water bath for 1 1/2 days to get rid of excess salt. Then made a pastrami rub. Put all over brisket to marinate. I cleaned the ribs then put a rib rub to marinate for 2 days. Made the chimichurri sauce, salsa, and terriyaki sauces a day ahead.
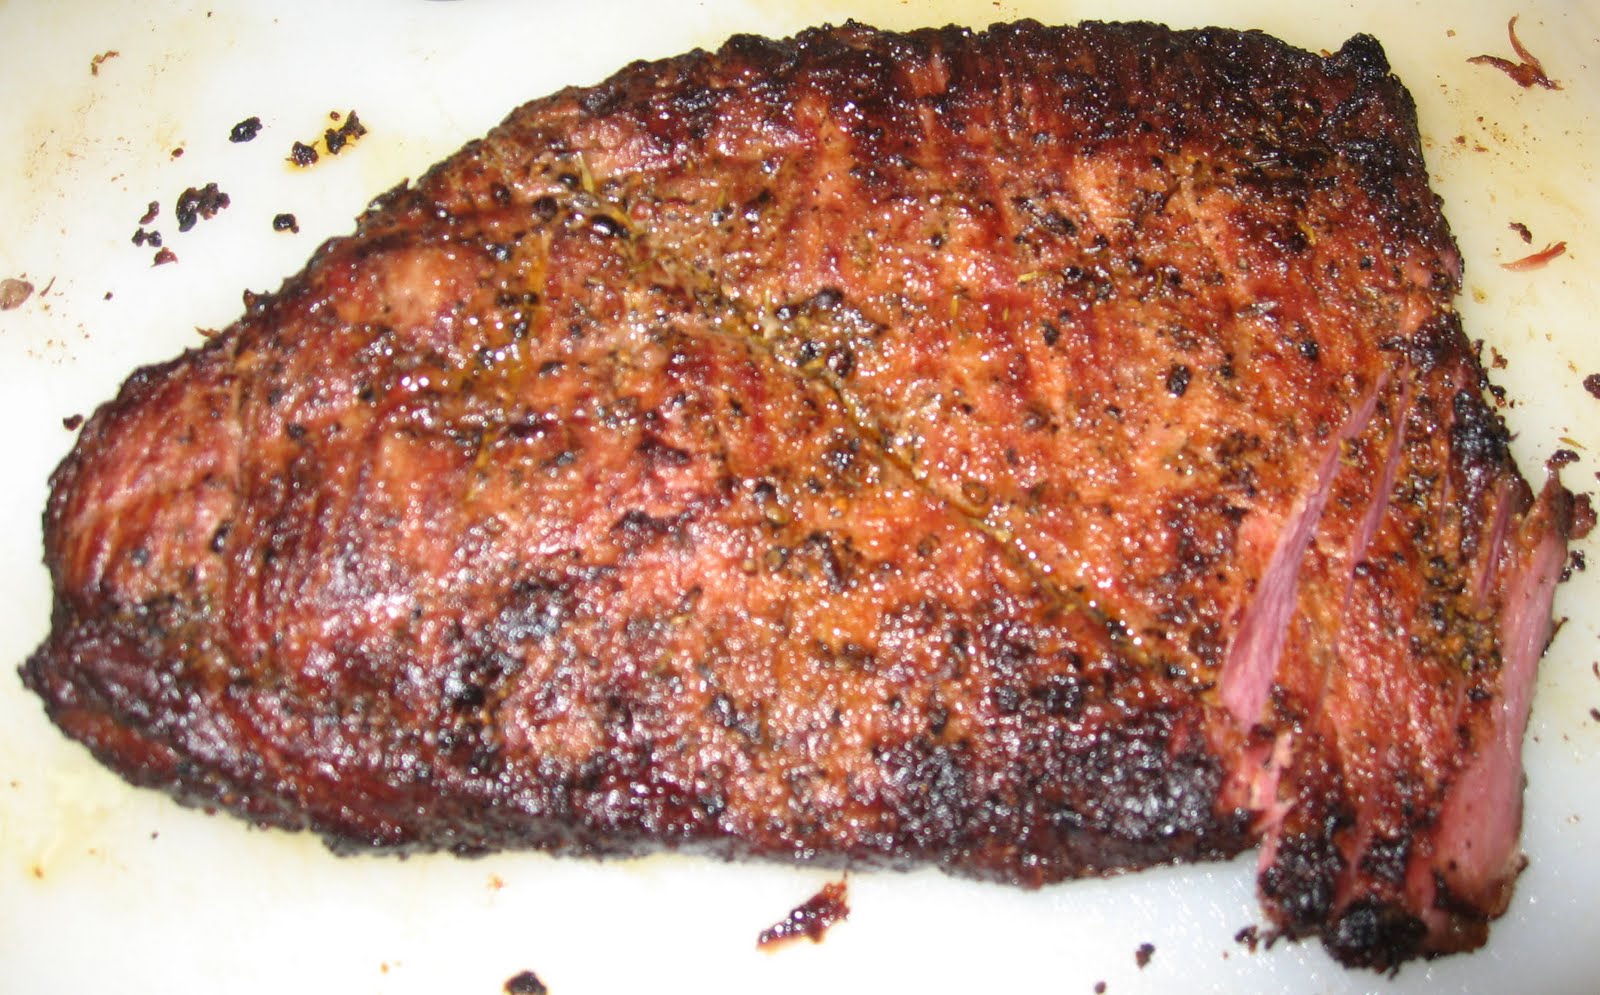

Top: The whole brisket out of the grill
Bottom: brisket sliced on plate


Left side: dry rub ribs Right side: wet rub ribs
Below ribs: Pineapple BBQ sauce


To prepare the grill to cook the ribs and brisket, I created a smoker. To do this you soak wood chips for 1 hour then drain. Prepare the grill for indirect heating, where you put coals on one side of the grill and add the wood chips on top of the hot charcoal. This allows the brisket to slow cook without getting the outside burnt while the inside is not cooked. Also the wood would give the brisket a slight smoky flavor.

Place the brisket on the side without the coals and wood. Place the one rib on the side with the coals, depending on how big your grill is you can add more ribs. Close the grill and let the meat cook the brisket for about 3 hours, depending on how big of a brisket you have. Check on the brisket so it does not get burnt. Cook the ribs for 2 hours. Check every hour and turn the ribs, making sure they do not burn. after the last 30 minutes, take pineapple BBQ sauce and baste on the ribs to get a nice caramelized wet rub. Ribs are done when you hold them with a tong and they flop at a 45 degree angle. Brisket is done when internal temperature reaches 185 degrees.

Jerk style chicken wings

Terriyaki style chicken wings

Chicken drumsticks on the grill

Steak with chimichurri sauce

For the chicken wings, chicken drumsticks and steak, prepare the grill for direct heat. You need high heat to be able to create a nice crust on your wings and steaks. To create direct heat just spread hot coals all over the bottom of the grill. Put seasoned wings on oiled grill and cook until done. For the terriyaki sauce chicken wings, take the cooked wings and toss in the sauce. I also cooked chicken drumsticks in homemade dry jerk seasoning and a honey garlic glaze.

For the steak, make sure coals are very hot, Place marinated steaks with salt and pepper onto the grill. For medium rare, cook one side for 4 minutes, turn and cook other side for 3 minutes. Place on plate and let sit for 10 minutes (this is crucial) for the juices to redistribute and get a juicy steak, if you cut after you take off the grill the juices will run and you will have a tough steak. Patience is key to having a perfect steak. Drizzle homemade chimichurri sauce over the sliced steaks.


My friend made sausage with peppers and onions. We grilled the sausages (sweet), then sliced them. Sliced up the green and red peppers and onions. In a saucepan we took the peppers and onions and cooked until almost caramelized then added the cooked sausage to heat all the ingredients together.

I also prepared homemade lemonade and ginger peach iced tea. For the iced tea I took fresh peaches and cooked them then strained the juice, made hot tea and added minced ginger, sugar, and the peach juice then let this sit overnight. Next day, strained the ice tea to get rid of the ginger. Add some ice cubes. Made a simple syrup in case it was not sweet enough for people.

This was a very successful BBQ party, people loved the ribs to the brisket to the steaks. Now to think of what New I can make for next year :)

Friday

Homemade Peach jelly and Jam

I have been fascinated in making my own jelly and jams since the store bought ones contain so much sugar and additives. I am at my aunt's house in Los Angeles and the house has a peach, ,fig, lemon, lime and orange tree. Some of the peaches were ready to pick. Since I got a lot of peaches, I first made peach pie then was wondering what else I could do and thought of jelly and jam,. So I decided to try my hand at making peach jelly and jam from scratch. I looked online to find recipes that did not use pectin to gel the mixture (since I feel pectin adds chemicals). Lots of websites to read. I also found how you can make natural pectin from apples, lemon juice, and water. Apples are high in pectin so that is why you use them in place of pectin you buy at stores. So, I decide to do a recipe I read on Livestrong.com with a few tweaks, less sugar and a bit more lemon juice. (recipe below).

After cooking the peach mixture for about 20-30 minutes, I strain some of the peach pulp to make jelly and saved the rest to make the jam. Then I reheated the jam and jelly until I got a thick consistency. Since I only had one apple I made about 4 tablespoons of Natural apple pectin. From the amount of jelly and Jam I made this was definitely not enough but it helped a bit to get the jam and jelly more gel like conistency. After cooking the mixtures for about another 20 minutes, It was not as thick as store bought jelly or jam but enough to spread and not be to watery. I let it cool then place in glass containers. Put into the fridge. Now I have peach jam and jelly for breakfast with my toast. Very yummy!! Next time I will try to make more natural pectin. This is a simple process to do just a bit time consuming but worth all the effort. A great way to make a gift for people during the holidays.

Peach jelly and jam Recipe
3-4 lbs. fresh peaches (ratio of 3 to 1 for ripe to unripe peaches)
5 lbs sugar (more if you like sweeter)
3 tablespoons lemon juice
1/2 cup of water
Nautral apple pectin Recipe below)

Directions:

1. wash and peel peaches and chop into small pieces. Put into a large heavy saucepan. Add lemon juice and water.

This is after it has cooked for at least 20-30 min.

2. Cover and boil over medium heat. Add the sugar. Reduce heat to low and simmer for 20 to 30 minutes.

This is for peach jelly (without pieces of peaches)

This is peach jam (pieces of peaches)

3. Strain half of the peach mixture into a glass bowl to make the jelly and save the other half to make peach jam.

4. Return the peach juices to the pans and let boil for another 10-15 minutes until it is slightly thickened.

5. Make the natural apple pectin (recipe below). Add to the jelly and jam saucepans.

6. cook until mixture thickens. Turn off burners and let the jam and jelly cool.

The final peach jam

The final peach jelly

7. After the jam and jelly are cooled, place in glass bowls and put in fridge.

Natural Apple Pectin
Ingredients
2 lbs. of tart apples (more unripe than ripe)
2 tablespoons lemon Juice
3 cups water

Directions

1. Chop apples and leave core. Place all apples and core in a saucepan. Add lemon juice and water. Bring to a boil on high heat.

2. reduce heat to medium and let simmer for 20-25 minutes.

3. Pour the apple pulp and juice into a sieve. Squeeze out all the juice from the apple pulp.

4. Pour juice back into saucepan and boil until reduced by half. To check to make sure it gels, take a cold spoon and put some juice, if it gels when pushed with finger it is done, if not cook longer until it gels.

5. Use within 4 days or store in freezer up to 6 months.


Indian Dahl Lentils

I have been going to Costco and they have the Madras Lentils sometimes as a sample. I really liked the taste with the spices that are in it. Since it is kind of pricey for a box, I wanted to see if I could make it. I looked online and saw several recipes for it. I first found out it was an Indian dish then found out you use red lentils. Then one day I was going through my Joy of Cooking cookbook and saw the recipe. I was excited since everything I have made from this cookbook has turned out great. I decided to make the recipe today.

The recipe stated to use only 1 cup of lentils but I bought a 16 oz bag which was about 2 1/2 cups, I decided to use all of it. I had to also adjust the rest of the ingredients to account for more lentils being cooked. Also, I added an extra Indian spice blend that I made myself, Garam Masala. I saw a recipe for dahl that also used this so I decided to add this to my dish to give more kick. This is a blend of spices such as cloves, nutmeg, corriander, black pepper, cumin, and other indian spices. Another thing I noticed from the Joy of Cooking recipe versus others I found online is that the Joy of Cooking recipe says to add lentils then add the water and spices while other recipes online says to cook lentils first then in another pot first stir in the onions and spices then the tomatoes to get the aroma coming out, then you add the cooked lentils and water. I also did not account that tumeric would turn my red lentils into a bright yellow color. I was trying to get a brown like color similar to the Madras lentils. The ending result was tasty but reminded me more of a curry flavor than the madras lentils I tasted at Costco. Don't get me wrong, the final dish I made was flavorful and tasty but not the taste I was trying to go for. I will have to try to make this dish again one day with less tumeric. Recipe adapted from Joy of Cooking Cookbook with some added spices.


Indian Dahl Lentils Recipe
Ingredients:
1- 16oz bag of red lentils
2 tablespoons oil
2 tablespoons tumeric
1 tablespoon garam masala
salt
1 medium sized onion sliced
1 medium sized tomato chopped
2 tablespoons minced garlic
3 cups water

Directions:

The ingredients: sliced onions, chopped tomatoes, minced ginger

Lentil after a quick soak in water

1. Wash red lentils and pick over. Put in a bowl.

2. Heat a dutch oven or a heavy stock pot, add lentils and stir to cook. Add onions, tomatoes, ginger, spices, salt, and water. Cover and let simmer for 20 minutes until lentils are tender and soup has thickened a bit.

Final Dahl lentils, put too much tumeric so it turned yellow instead of the
brown color that is from the Madris lentils brand
. It still tasted delicious.

3. add more water to desire consistency. also add more salt and/or spices to taste. Serve hot. If desired, add a dollop of yogurt.

FREE Magnum Ice cream bars


I got a coupon from FoodBuzz tastemaker program to try the new ice cream bar brand Magnum. These are ice cream bars with vanilla bean ice cream coated with a Belgian chocolate shell. These have been popping up at all my local supermarkets and retail stores. The box comes with 3 bars and usually cost around $3.99. I decided to get the double caramel flavor. This flavor consist of silky vanilla bean ice cream enrobed in a luscious chocolatey coating, rich caramel sauce, and thick Belgian milk chocolate. It looks like they took a vanilla ice cream bar that is coated with chocolate then spread caramel sauce then put as top layer a Belgian chocolate coating. The bar was a bit too sweet for my taste. Also the caramel sauce in the middle was a bit thick due to it being in freezer. (maybe if I let it sit out for a minute or 2 it would be more smoother and less thick).

Not sure if I would actually by the bars since it is quite expensive for a box with only 3 bars. But I am glad that I got a chance to try the product. Always good to try new things to see if you like it or not. Glad I got the chance to try these.

Thursday

Pickled Jalapenos

I was making nachos today and wanted to put jalapenos on it but we only had fresh ones. I know fresh is always better but for nachos I liked using the pickled jalapenos you buy at the store. It just makes nachos more authentic. So I thought can't I just make pickled jalapenos myself? Since I made pickles (I was so easy, see my other previous post). I went online to see what I needed to use to make pickled jalapenos. It is very similar to making pickles but the recipe I found uses bay leaves. You first cut your jalapenos into 1/4" rounds (you can leave whole if you like), then steep the pickling mixture on the stove for 5 minutes then place in a glass jar with the sliced jalapenos. The recipe I used says to wait one week. I already see the jalapenos changing into the dark green color like the store bought ones. I am excited to try them. If these taste just like the store bought I will soon be making my homemade pickled jalapenos for all my nacho and Mexican dishes or to just spice up any dish. Recipe below.

Pickled Jalapeños
Adapted from Michael Symon’s Live to Cook by Michael Symon and Michael Ruhlman.

Ingredients:
1 pound (450g) fresh jalapeno peppers, washed and sliced into 1/4" rounds (see Note)
2 1/2 cups (625ml) water
2 1/2 cups (625ml) vinegar (I used white distilled vinegar)
3 tablespoons sugar
3 tablespoons coarse salt, such as kosher
2 bay leaves
2 tablespoons whole coriander seeds
3 cloves garlic, peeled
2 tablespoons black peppercorns

Directions:
1. Cut each jalapeno into 1/4" round slices (take out some of the seeds and veins, to make less spicy) with a sharp paring knife and place them in a large glass preserving jar.

2. In a non-reactive saucepan, bring the other ingredients to a boil, then reduce the heat and simmer for five minutes.

3. Remove from heat and pour the brine over the peppers. Place the lid on the jar and let cool. Once cool, refrigerate for at least a week before using, if possible. (You can use them sooner, but Michael says they’re worth the wait.)

Serve with Mexican dishes, or remove the seeds then chop and use to season any recipe that is improved by a little bit of sweet heat.

Storage: I’ve kept pickles like this for up to a few weeks, under refrigeration, without any problems. But like anything preserved, you should take precautions.

Note: You can use another chile pepper in place of the jalpeños.

Wednesday

Homemade Pickles

I had a few kirby cucumbers and wanted to find a recipe to make with them besides just cutting them for salads. I found a recipe to turn the cucumbers into pickles. A friend made pickles before and told me how easy it was to make. So I decided to turn my cucumbers into pickles. First you need to make a pickling solution that mainly consist of white vinegar. You cook the white vinegar with some salt, sugar, water and dried red peppers and boil the solution until the sugar is dissolved. Then turn off the fire and add sliced garlic and a few peppercorns. Let the pickling solution cool for 1 hour. While the solution is cooling, cut the cucumbers into desired slices--into 1/4" inch rounds (used as a condiment for burgers) or sliced into 1/2" inch thick long sticks (used to eat alongside your meal). Take the slices and put into a big glass jr that can old them. Take the cooled pickling solution and pour just enough to fill the top of the sliced cucumbers. Put in the fridge and let it sit in the pickling solution for 3 days. Ready to eat. These are so easy to make. Other variations is to make dill pickles using dill herbs in the solution. Recipe below.

Homemade Pickles
Ingredients:
1-2 lbs. cucumbers, sliced
3 cups white vinegar
1 1/2 cups of water
4 tablespoons sugar
1 teaspoon whole peppercorns, crushed
4 tablespoons salt
2 dried red peppers (add more if you want spicier)
3 cloves garlic, sliced
big glass jar

Directions:
On stovetop, heat on high heat the vinegar, sugar, salt, water, and red peppers. Boil solution until sugar is dissolved. Take off heat, add the garlic and peppercorns. taste and add more sugar if needed. Let cool for 1 hour.
While pickling solution is cooling, slice the cucumbers (rounds or sticks) and put into glass jar. When pickling solution is cooled, pour into the jar just to fill the top of cucumbers. Place the jar in the fridge and let it sit for 3 days. Ready to eat on the 3rd day. Depending on how you slice them, use them as a condiment on burgers or a side with your meal.

Thursday

Miso Glazed Tilapia with Salsa

Miso is a thick soy paste that is widely used in Japan. Most of the time I use miso only in making miso soup with tofu. I have seen them use miso for fish so I decided to try it. I used tilapia filet since it is a firm, very mild tasting fish and would take the miso marinate well. I looked up a recipe to get the basic marinating sauce. I put miso, sesame oil, soy sauce, and some apple cider vinegar (since recipe asked for mirin and I did not have, this is similar so I used it). Then I mixed it all together. I added some water to thin the sauce. Marinate the fish in the miso sauce for 30 minutes and up to 1 hour. When ready to bake the fish, put on a baking sheet and top with sliced scallions and sliced ginger. bake in oven until flaky and cooked.

Then I decided to add a bit more flavor with a simple salsa as a topping. The salsa consist of chopped tomatoes, cilantro, red onions, and some lime juice. All mixed together and let it marinate together so flavors come together. Once fish is done plate then top with the salsa. This goes well with a nice leafy green salad or some steamed vegetables. This is a great recipe. Recipe below.

Miso Glazed Tilapia with Salsa

Ingredients:
4 tilapia filets
2 tablespoons miso paste
1 tablespoon apple cider vinegar
3 tablespoons soy sauce
2 tablespoons sesame oil
2 tablespoons brown sugar
3-4 tablespoons water (depending on how thick you want the sauce)
Salsa (Recipe below)

Directions:
1. get a big bowl and add the miso paste, apple cider vinegar, soy sauce, sesame oil, brown sugar. Mix well. Add the water, depending how thick you want the sauce.
2. Brush some miso sauce on the tilapia filets. Coating both sides. Let it sit for 30 minutes and up to 1 hour.
3. preheat oven to 475 F. Place marinated fish on a baking sheet. Bake fish for 8-10 minutes until flaky but not overcooked. serve with salsa topping.

Salsa:
1/2 cup chopped tomatoes
1/2 cup chopped red onions
1/2 cup cilantro
juice from 1 lime

Directions:
1. Mix all ingredients in a bowl. Cover and place in refridgerator for flavors to come together.
2. Spoon over the baked miso glazed tilapia.